Wednesday, October 19, 2011

Hand print spider

What you need:
Black paint
Scissors
Glue
Black, blue and red construction paper
Pencil
Google or sticker eyes

This one is fun for the kiddos! Who doesn't love to paint their hands?? Take your base paper (I am using light blue) and draw a line from top to bottom, side to side, and corners to diagonal corners.
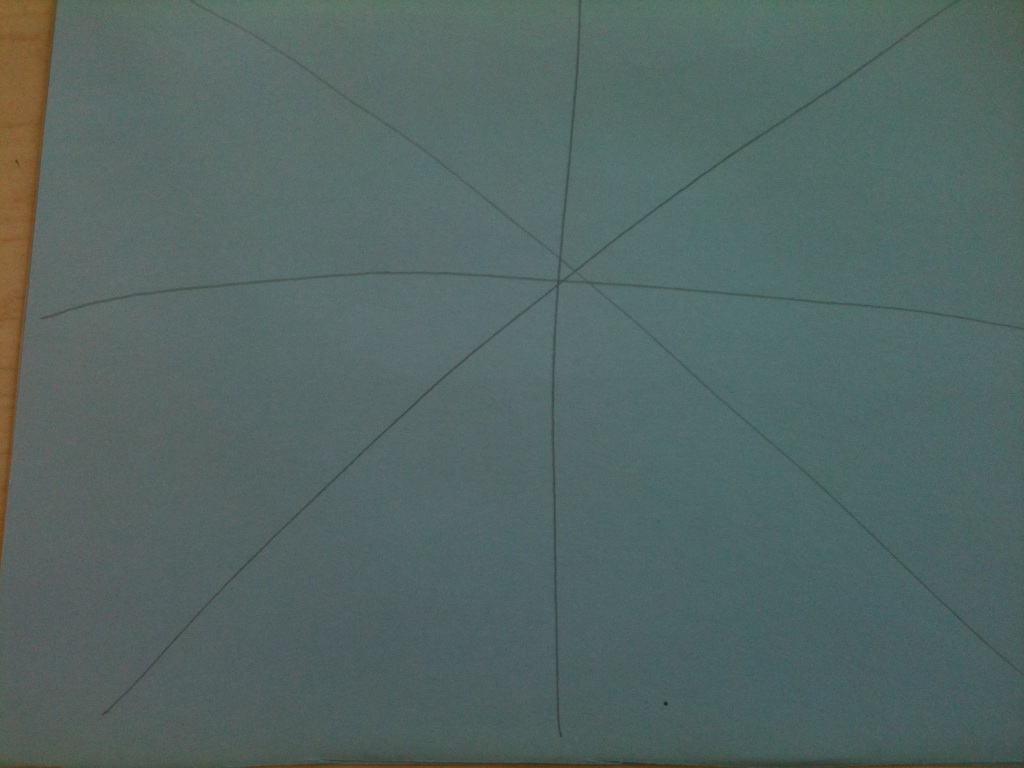
Next, make an arch from line to line making your spider web design.

Now comes the fun part! Paint one hand with the black paint. Be sure not to paint your thumb! Push hand on paper to make one side of your spider. 

Repeat for other side. Make sure you don't paint your thumb! Place palm over palm and press hand to paper.
Make a circle the size of your palm print and glue it to the center of the hand prints (this is the abdomen).
Make a smaller circle for the head and glue it on. Add eyes ( I used stickers, but google work too). 
I made an hour glass shape to glue on the back to make the spider a black widow, but my little helper decided she liked it better as a hair bow =) Some of the boys decided it was best for a bow tie. This is where your kid's creativity really shines! Add a mouth too if you like! Enjoy!


Friday, October 14, 2011

Paper Strip Pumpkin

What you need:
Orange green and brown construction paper
Brads (2)
Scissors
Pencil

This was one of the projects we did at work last week. Take a piece of orange construction paper and fold it into 6 equal strips.
Next, have the kids cut down the fold lines so you have six strips of paper.
Now, stack the paper in a pile. I like to make a dot on the ends of the paper where the brads are supposed to go through. Make the dots on both ends of the paper strips.
Push the brad through all the papers one at a time where the dot is. Careful, they're sharp!  When the brad is through all the papers open the back to secure it.
Take the green construction paper and have the kids trace their hand and cut it out. Also, make  a stem shape out of the brown construction paper and cut that out. Add the dot where the brads go.

Now it's time to layer! Put the brad through the stem, then the hand print, and finally through the other end of the orange strips. Make sure you open the brad on the other side.

Take the strips and start pulling them apart until all six make a circular shape.
Bend the stem up and tada! Some of the kids used black construction paper and cut out triangles and a smile to make their pumpkin a Jack-o-Lantern. Enjoy!


Wednesday, October 12, 2011

Dracula and Frankenstein

What you need:
Dracula
purple, black, and white construction paper
black marker
Glue
Scissors 
Dracula shapes (which I am trying to get for you guys)

Frankenstein
Green and grey construction paper
Green glitter
Black tissue paper
Black marker or crayon
Glue
Scissors
Google eyes
Frankenstein shapes (which again, I am trying to get for you guys)


Okay, again, this isn't my project. My very talented co-worker has art this week (and yes, she said I can post pics). This week the kids made Dracula and Frankenstein. Unfortunately all I have to offer you are these pictures. If I can figure out how to download a template that will print actual size I will, but for today, this is it. Once you have your shapes cut out, you just glue them together! For Frankenstein's hair, you use the tissue paper technique discussed in the Eyeball post. Other than that it's all just look and assemble. Although it seems like all the project will be identical, they rarely are! Ever Dracula and Frankenstein will have a personality all their own simple by changing the eye placement, eyebrows, mouth....the possibilities are endless to make them different! In the picture below, the young girl decided her Frankenstein needed a blue hair stripe. Some kids decided their Frankenstein was a "Fran"enstein!  Encourage your kids to get creative! Enjoy!

Monday, October 10, 2011

Paper Plate Eye Ball

What you need:
paper plate
pencil
tissue paper (black, white, and whatever color you want for the iris)
glue
scissors
red crayon

This one I can't claim for my own. My very talented co-worker did this fun project for art today. First you take your paper plate and draw a circle to make your pupil. You can make two smaller circles inside to make the glimmer ;)
Now, cut your tissue paper into small 2" squares. 
Ms. Crissenda chose these awesome colors to put out for the kids to choose from. Use the white tissue paper to fill in the two smaller circles (the "glimmer"). 
To apply the tissue paper squares, you have two options...well, two that I am telling you about. #1 Apply glue to the circle. Scrunch the tissue paper and press onto the plate.
#2 Apply glue to the circle. Take the eraser end of your pencil and wrap the tissue paper around the top and scrunch it. Press the flat end into the glue and pull pencil away.
Now that the two smaller circles are done, continue the same process for the black pupil and colored iris. Lastly, take your red crayon and draw the veins. Tada! A spooky craft that's fun for kids. Enjoy!


Saturday, October 8, 2011

Felt Flowers!

What you need:
Felt
scissors
glue gun

Okay, I am obsessed with these right now! How cute are they? And OOOooo the possibilities! Okay so first you start with a circle. Any size is fine, the larger the circle, the larger the flower. Feel free to play around with the different sizes. This particular one is about 7". You are going to be cutting it into a spiral shape, so you can draw the spiral on the felt if you wish (I just free style it). I have drawn a spiral on the pic so you get the idea. 
Once you have your spiral, you scallop the edges. A sharp pair of scissors makes this process sooo much easier!
Don't forget to leave a circle in the middle like the pictures above. Now that you're done cutting, it's time to get rollin'. Take the outside strip and start rolling it towards you, like a fruit roll up. =) Mmm...sounds yummy right now! Roll it all the way until you reach the inner circle.

Now you cover the flat bottom of your flower with glue and take the inner circle and place it on top of the glue. This holds it all together and gives the flower a nice finished look.
Flip it over and there you have it! You can make different sizes and put them on a headband, hair clip, wreath...you name it! I hope this was helpful, but just in case you don't feel like tackling this one, I do sell them on my fb page. www.facebook.com/peekabowboutique 
Enjoy!

Dino Torn Art

What you need:
Glue
Scissors
Construction Paper (whatever colors you want for your dinos)
Dino Template
Pencil

Okay, so here's an easy one. All we did for this fun guy is draw a dinosaur template for the kids to trace. Can't free hand a dino? No worries. Here's a link to one I found that you can print and cut out. http://coloringville.com/images/dinosaur-coloring-pages/dinosaur-coloring-pages-3.gif
If you have little ones that need a thicker template, cut it out of construction paper or cardboard.Once you have your cut out, trace it onto your paper.  So far so good? Okay, next you get colored paper (we used construction paper) and tear it to pieces! Literally! Take the torn pieces and glue them inside the dino shape you drew on your paper. Fill the drawn shape completely. And VIOLA! You're done! You can use different colors to add details like spikes, eyes, toenails, whatever! Also, add some character  by making the scenery the same way. This art can work for any holiday or season. We have done this for fall (making a fall leaf or pumpkin) and for winter (making a snowman). If you have a template, you can make it! You will love how creative kids get with this! From polka dot dinos to striped stegos, no two will be the same! Enjoy!

Okay...Let's get CRAFTY!

Okay so I LOVE doing anything crafty! I paint, draw, make bows, crochet, sew....the list goes on and on! On top of all the things I do on my own time (which falls during nap time), I also work in an elementary school day care. Working at a day cares allows me to do crafts at work too! So I am dying to share all the awesome projects we do with the kids! This blog is meant to inspire crafters out there and to help the not-so-craftys. ;) Please leave feedback, ask questions, share your own projects, and just enjoy! Oh! Also, I'm new to this blogging thing, so please, bear with me! =)